5 September 2017
Points to consider when removing popcorn ceilings
If you have ever lived in a house, flat or unit with a popcorn ceiling treatment you’ll know what a dust magnet it can be. As an added bonus spiders love to use the cavernous surface of the ceiling to establish cobweb shanty towns with hidden depths no bug spray will ever reach. Plus, if you’re lucky enough to live on a busy road as many flats and units are, the black pollution which comes off the roads settles gently into the little crevasses like an ominous dark cloud over your couch. Yikes, makes you wheeze just thinking about it.
Why popcorn on the ceiling was once thought to be a great idea
Invented as a great sound proofer for homes in the 1950s, the popcorn ceiling (or vermiculite ceiling) was also intended to help a room feel homely (which really meant dark and dingy). Another odd objective of this treatment was to disguise imperfections in the ceiling surface. That’s like trying to hide a small ding in your car’s bumper by driving the car into a brick wall. True, you can’t see the ding, but now the whole car’s a mess.
The hidden dangers of popcorn
Prior to the late 1970s when the world discovered its dangers, ceiling treatment often contained asbestos. The asbestos was added as a fireproofing substance to reduce the risk of fire spreading through the home. Just when you thought popcorn ceilings couldn’t get any better, asbestos too, yeah! The good news is that asbestos shouldn’t cause harm unless it’s disturbed. Which is fine, unless you want to remove the popcorn ceiling.
Extreme caution needs to be taken with the ceiling until you know if it contains asbestos or not. Before even considering doing anything to it you’ll need to enlist the services of a professional asbestos testing company to establish whether it contains asbestos or not. This applies to dusting, vacuuming, and painting as well, don’t touch it until you know. Because of the flaky nature of the surface, it doesn’t take much to break bits off and it only takes a small disturbance to release enough asbestos fibres to cause a health hazard.
Top priority – get your ceiling tested for asbestos before touching it.
The fix
If the tests return a positive for asbestos you will need to get an accredited asbestos removal company to take out the ceiling surface safely. If you’ve cleared the popcorn ceiling can be dealt with in a few different ways.
- painting – painting the surface will even out some of the texture but it could take a load of paint and many labour hours to do.
- false ceiling – fitting a false plasterboard ceiling over the top of the popcorn texture simply covers the old ceiling with a new one. This option would depend on the height of the original ceiling.
- remove the popcorn texture off the ceiling and repaint.
Time to get messy
Removing popcorn ceilings is a seriously dirty business. If you can imagine opening the full dust bag from your vacuum cleaner and throwing the contents around the room. It’s going to be like that, only 100 times worse. Dust and lumpy wet globs will cover every inch of the exposed space. For this reason, it is important to remove as much furniture as possible and cover everything else.
- Tape plastic sheeting to the walls – start right at the top as the walls may get wet and dust marked.
- Cover the floor and all remaining furniture with plastic sheeting.
- Tape all the sheeting together to prevent dust from escaping.
- If you have lights or fans fitted to the ceiling you’ll need to get a licenced electrician to disconnect and remove them if necessary, for the duration of the job. Cover over the hole left by the fitting.
- Most power points and light switches should be covered by plastic but if not ensure they are protected.
- Wear protective clothing, eyewear and a dust mask when removing the ceiling. Everything up there is going to eventually end up on you.
- Working in sections spraying lightly until the section is damp.
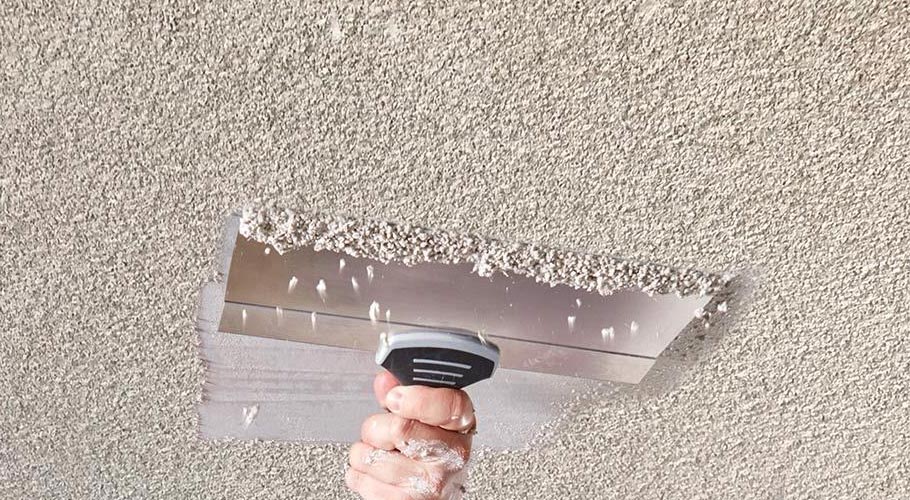
- Using a wide-blade putty knife gently remove the popcorn texture using long slow strokes to avoid cutting into the plasterboards underneath. If it doesn’t come off easily re-wet and wait a few minutes for it to soften.
- Fill any small marks in the plasterboard and repaint.
Hopefully, the plastic sheeting will have caught all the dust and rubbish, simply fold up and throw it out. Job well done, welcome to living dust and insect free in a bright, light room.
Of course, if getting covered in muck and dust is not your idea of a great weekend activity give a specialist a call and they’ll take care of the job for you.

Related posts
Suggested articles
No articles found

