5 September 2017
Why is my shower leaking?
You can see the signs, the paint in the hallway is starting to bubble and there’s a really nasty musty, damp smell to that end of the house. Mould allergy anyone? But short of taking a sledgehammer to the bathroom, how do you find out where the water is coming from so you can get someone to fix it?
Firstly, don’t panic. Quite often the leak can be fixed without removing large sections of the walls and floor. However, there is some urgency to the situation. If you’re seeing signs of the leak now, leaving it for much longer before repairs are carried out could mean the damage ends up being more than just a slap of paint and some mould killer.
All cracked-up tiles
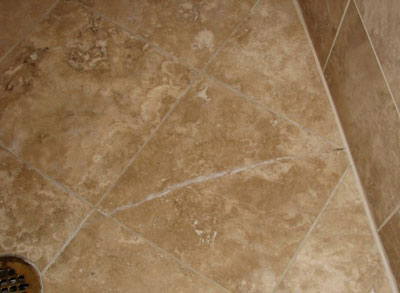
Take a visual inspection (or in layman’s terms, a look) inside the shower. Do you have cracked tiles along the wall or floor? Check all the way up to shower head height (no one can wash their hair without splashing). Even very small cracks can allow a substantial amount of water out of the shower over time. Sometimes a crack is only evident because of mould build-up due to water getting inside the tile or grout, pay attention to areas that need regular bleach.

Silicone valley
What about the silicone seals along the joins? Check the seal at the floor to wall junction as well as where the door or shower screen meets the shower base and walls. Shrinkage, mould stains and silicone pulling away can all mean the water’s getting through where it shouldn’t. Badly applied silicone seal can be a problem in DIY reno showers, if it looks like the seal was installed by a near-sited tortoise with the hiccups, it’s probably not doing the job. Seriously, there’s a trick to applying a seal to the floor and wall junction, our plumbers and handymen make it look so easy they could do it in their sleep, but it takes some practice to get it down pat. (And no, it’s not all about getting the right amount of spit.) We recommend that the silicon in the floor and wall junction is not replaced with just another squeeze of silicon as it does have a failure rate, rather we do use a special 2 pack epoxy resin that can handle any movement better than just silicon.
On a really obvious, but sometimes overlooked, point – the absence of seal altogether. Yep, this is like looking for something which isn’t there (now we’re getting all Zen). But there should be sealant around all of the junctions, if it’s not there you can add this to the list of things to fix.

Crumbling ruins of grout
Now to the grout. Any sections of grout which are coming out in chunks or just crumbling off slowly present potential leaking areas. As with the tiles, if mould is growing along some sections of the grout more than others the grout could be retaining moisture or letting water out. Even small cracks in the grout, especially in the shower floor, can let out enough water to cause problems.
Bit’s best left to the plumber
Phew, your eyeballs must be aching from all this checking. We’ve just about covered most issues you can easily identify. There are a few other areas that could be causing a water leak in your shower but we recommend these are checked by a licenced plumber. (And not just because of their crack silicone skills.) Call up a professional plumber to check for:
- leaks in the shower drain and surrounds
- water leaks in the pipes or connections within the shower wall
- taps or a shower head dripping back into the wall cavity
- failure of the waterproof membrane (which is placed behind the shower tiles).
Fix the shower properly
Now, hopefully, you have some idea of what’s causing your shower to leak. Time for some helpful solutions.
If the leak is found to be in the shower structure, ie the tiles, grout and seals, you have a couple of options. You can either do it cheap or do it right. Option one involves flying by the hardware store and getting some sealant and grout and channelling your inner tortoise. If you decide on doing it this way make sure you are nice to the guy at the hardware store, you’ll be seeing him often for more shower sealing supplies.
Option two is to do it right. Professional shower sealing might seem like a bit of a financial outlay to begin with but you’ll spend just as much in time wasted and patch up gear if you go with option one. The professionals will fill the cracks, repair the grout, re-silicon the shower screen and reapply a special epoxy resin to the floor and wall junction, then spray a waterproofing solution all over the shower. The service even comes with a warranty so you know it’s good stuff.
Whichever option you decide on, get on to it now before the shower leak causes more issues throughout the house.
Related Plumbing posts
Suggested articles
No articles found

